Define the custom fields that your organisation and project need. Specify custom Project/Issue fields at the global/project level

This plugin allows you to create custom fields that belong to either a Project or an Issue. Custom fields can be defined globally (for all projects/issues) or at the project level (for only this project / only issues for this project).
Any created fields and their values are then available to see on a Custom Project screen or the Issue screen.

Custom fields can be defined globally so that they are applicable to all Projects or Issues. The Global Fields Creator screen can be found under the Admin System menu -> Add-ons -> Custom Fields.
The screen is used to define global custom fields that apply to all Projects (for those with “Visible In” set to Project) and/or all Issues (for those with “Visible In” set to Issue). Each field has a number of attributes associated with it:
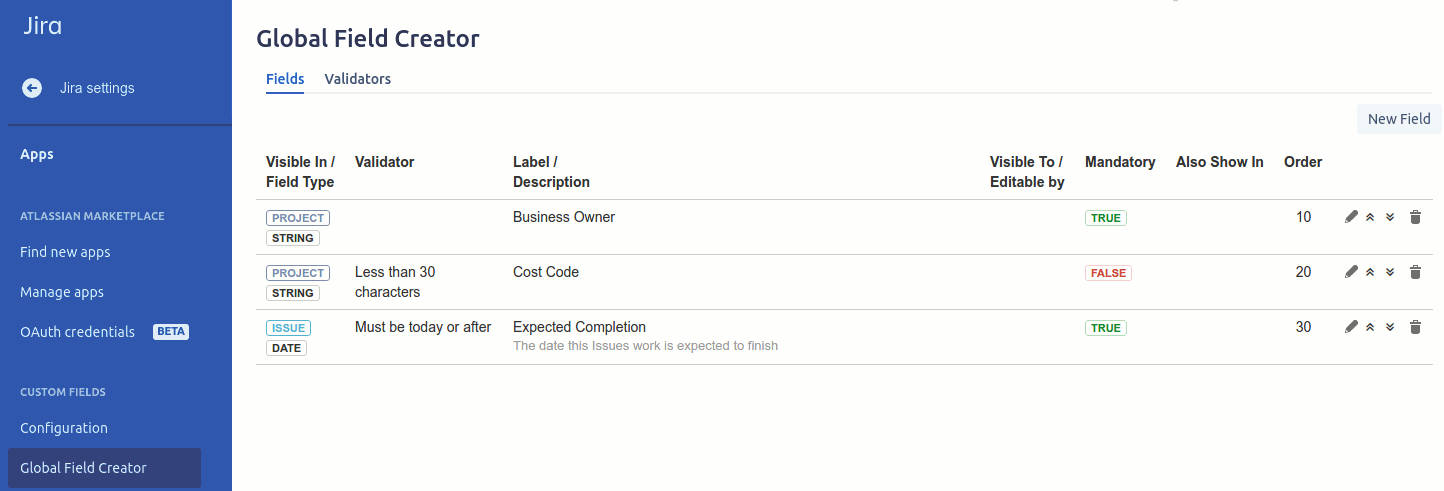
The icons on the right of the screen allow you to edit, move the field up in the order, move the field down in the order and delete the field. Warning: Deleting a field will also delete all values stored for that field. The move icon swaps the order values. So clicking the move up icon for the Business Owner would set the Business Owners order to 10 and Expected Completion to 20.
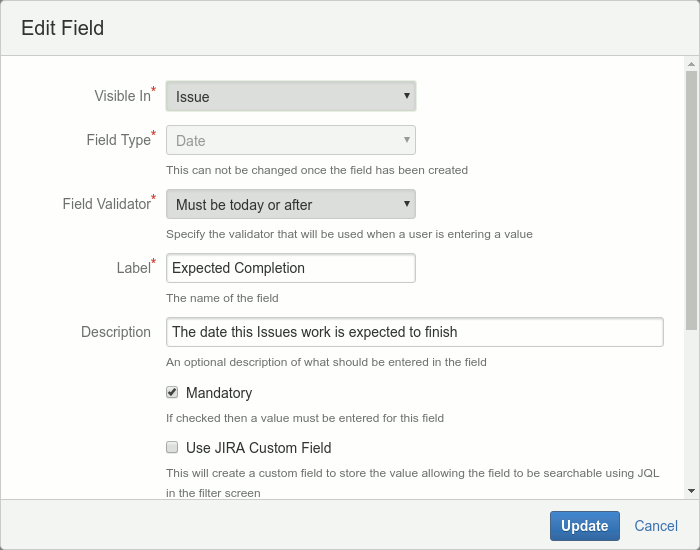
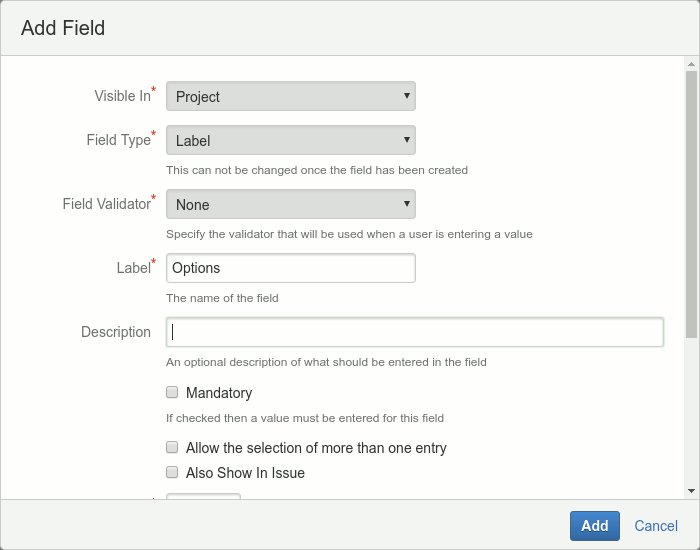
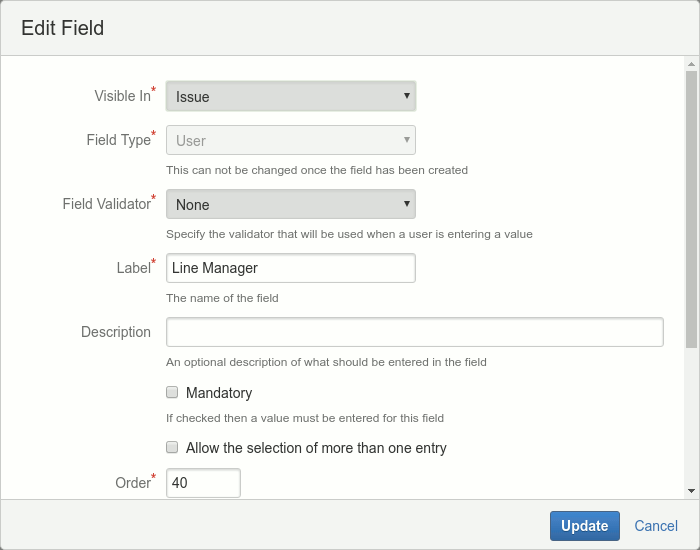
New Custom Fields can be created using the New Field button. The following different types can be created.
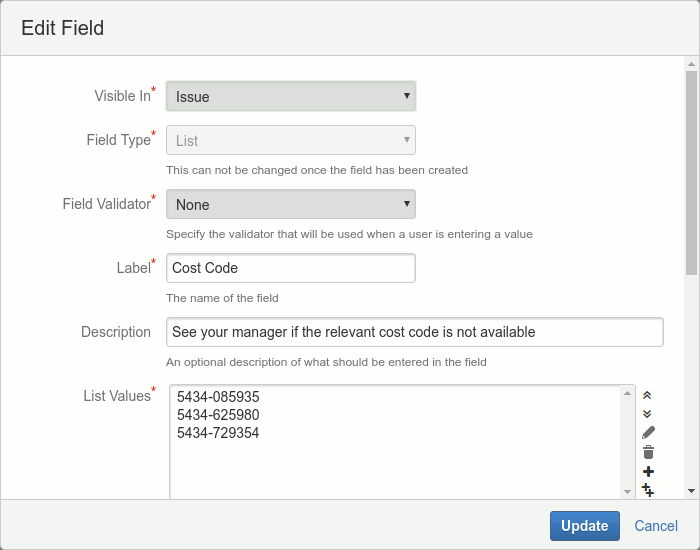
The list item entry field has a set of icon buttons on the side that allows you to: move an item up, move an item down, edit the items value, delete an item, add a new item and add multiple new items. Warning: Deleting a list value that is in use will cause the fields that use this value to be blank, even if the value is added back in later.
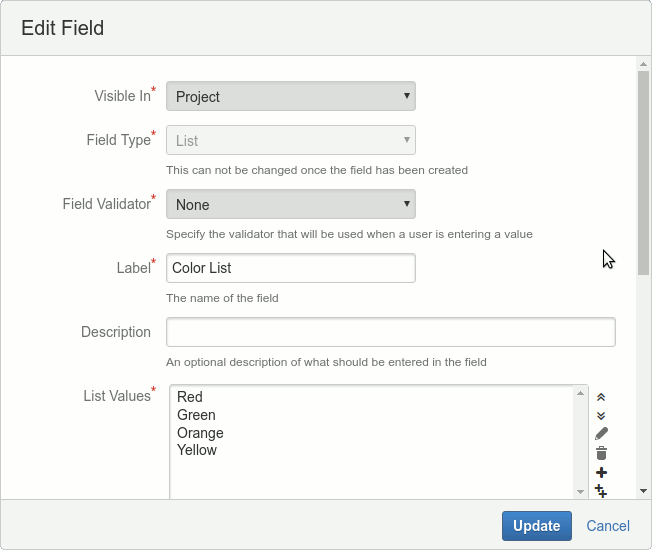
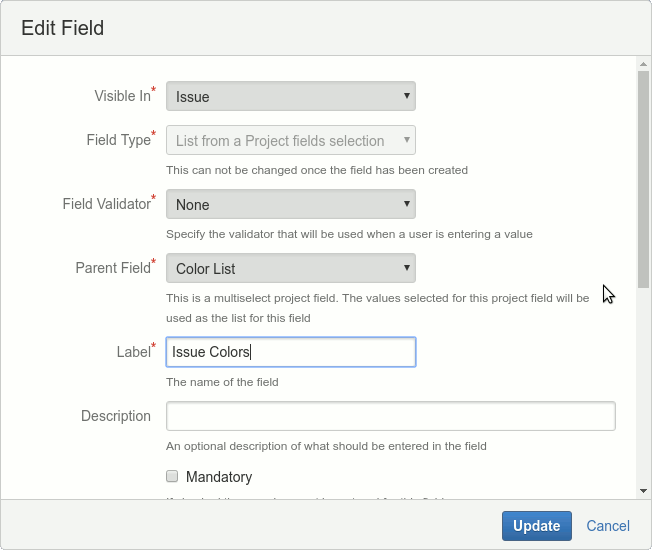
The add-on allows you to do sub-lists of another project list. To accomplish this you need to set up a list that is visible in projects and allows the selection of multiple entries. You then create a new field of type “List from a Project field selection” that is visible in Issues.
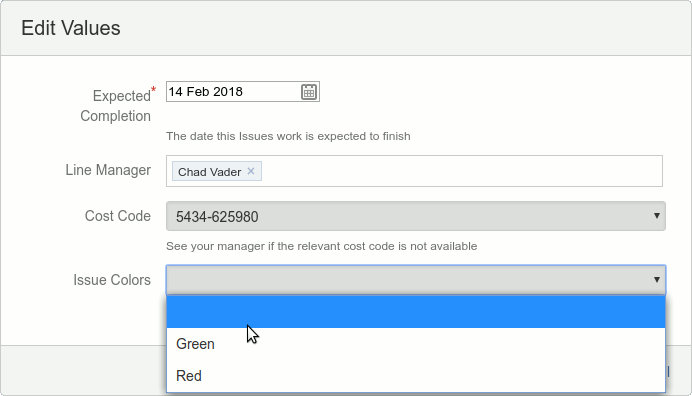
Once items have been selected for the project those items will be the only items available for the issue field. So if you set up a project field with the list values Red, Green, Orange and Yellow. In the project fields screen, you select Red and Green. When you edit the issue field the field will have the entries Red and Green as options to select.
Only System admins can see and use the Global Custom Fields screen.
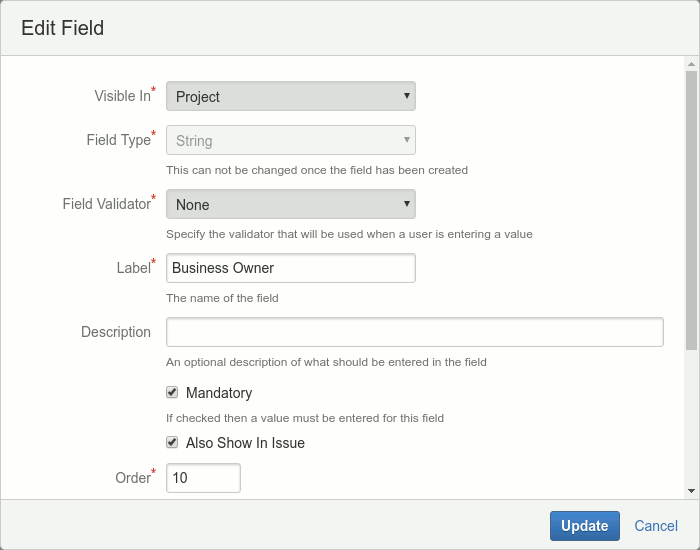
If the “Use JIRA Custom Field” option is checked then the value of a field will also be stored in a JIRA Custom Field. This allows the field value to be displayed and searched for in the Issue Navigator using JQL. The JIRA Custom Field is not displayed in the Issue, New Issue or Edit Issue screens. The value in the JIRA Custom Field should NOT be edited as this is only a copy of the fields actual value.
Only Issue fields of the type: Date, single Label, multiple Label, single item List, Number and String can be made searchable.
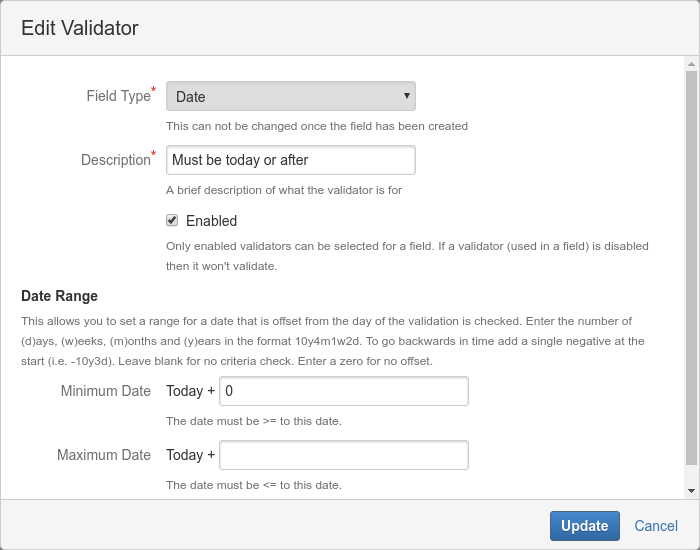
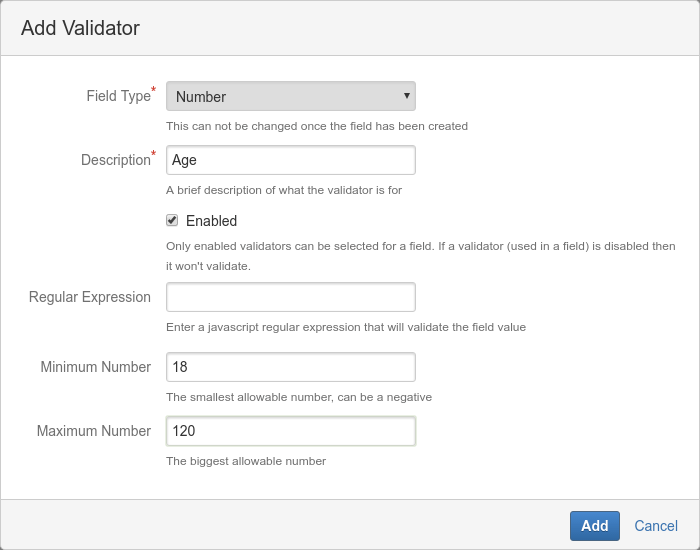
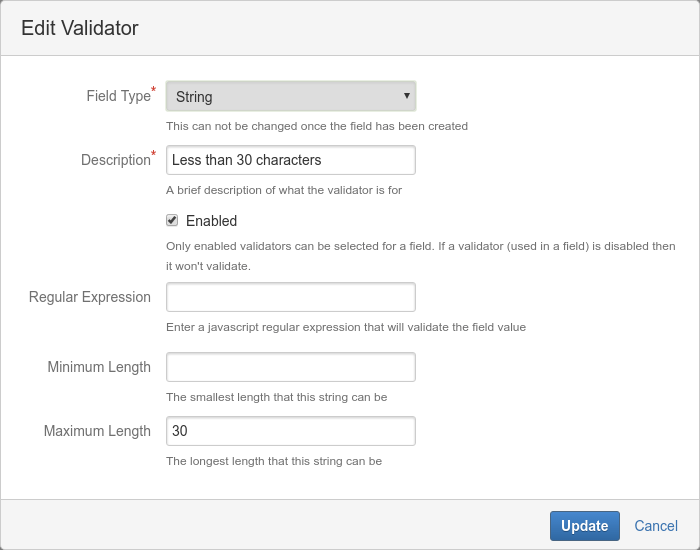
Validators allow you to assign validation to the values for a field.
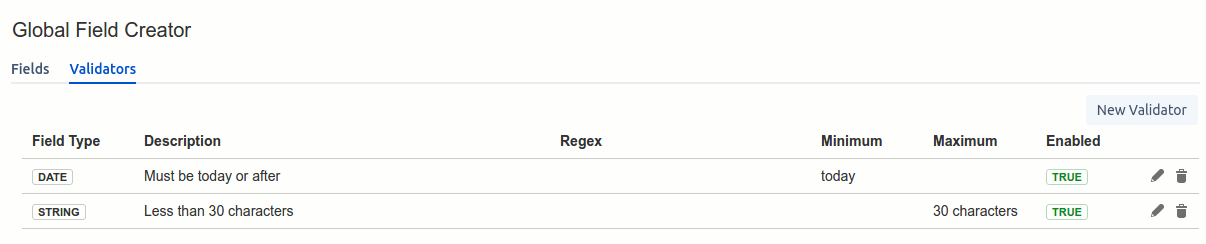
The screen is used to define global validators that can be used in all global and project fields. The fields for each validator have a number of attributes associated with it:
The example below shows the different types of validators.
The alternative to entering global custom fields and validators is to have Project level fields and validators. The fields defined here will only appear in the Project they were created in and Issues belonging to that Project. The validators will only be able to be used for the fields defined in this project.
The functionality of this screen is identical to the Global Custom Fields/Validators screen so please read the section above to find out more details.
Only Project admins are able to see and use the Project Custom Fields screen.
Fields that have “Visible In” set to Project will appear in the screen below. Any values set for these fields will only appear in the Project they were set in.
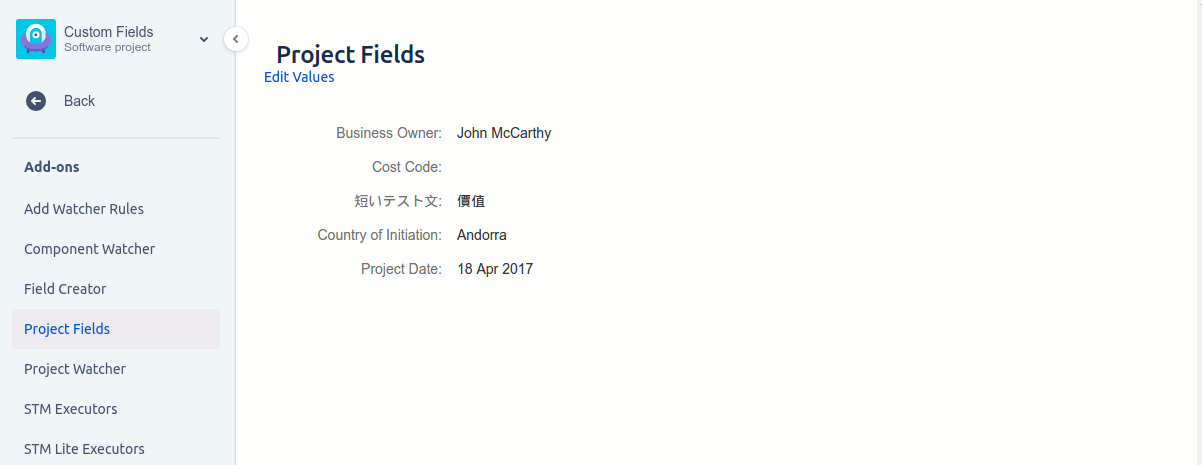
Initially, any new custom Project fields are empty. If the field is mandatory and there is no value then the text “Value Required” will be shown in red.
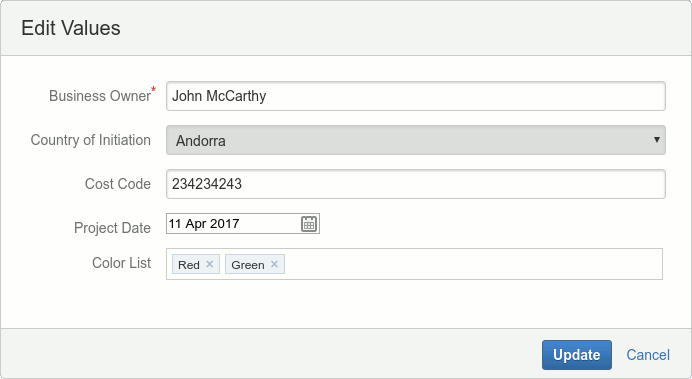
Values can be edited by clicking on the “Edit Values” link. This will open a dialog showing all custom fields for the Project you are in. For the example below the entry for the Business Owner is a string field but it could also be a user field if the business owner was a user within Jira.
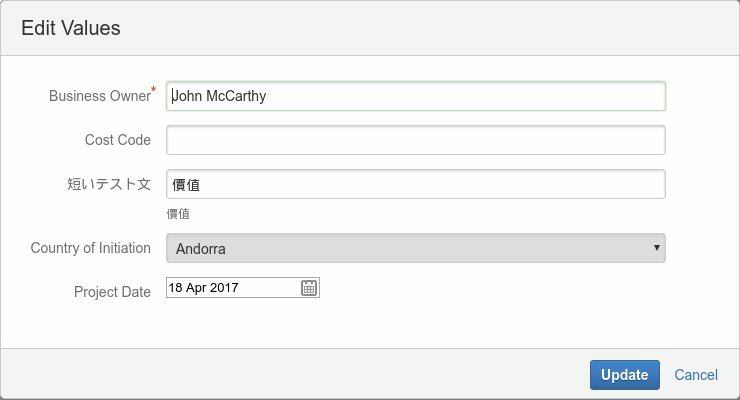
All mandatory field values must be entered before the values are updated.
Only Project admins are able to set or change the values in these fields. All users are able to see this screen and the field values.
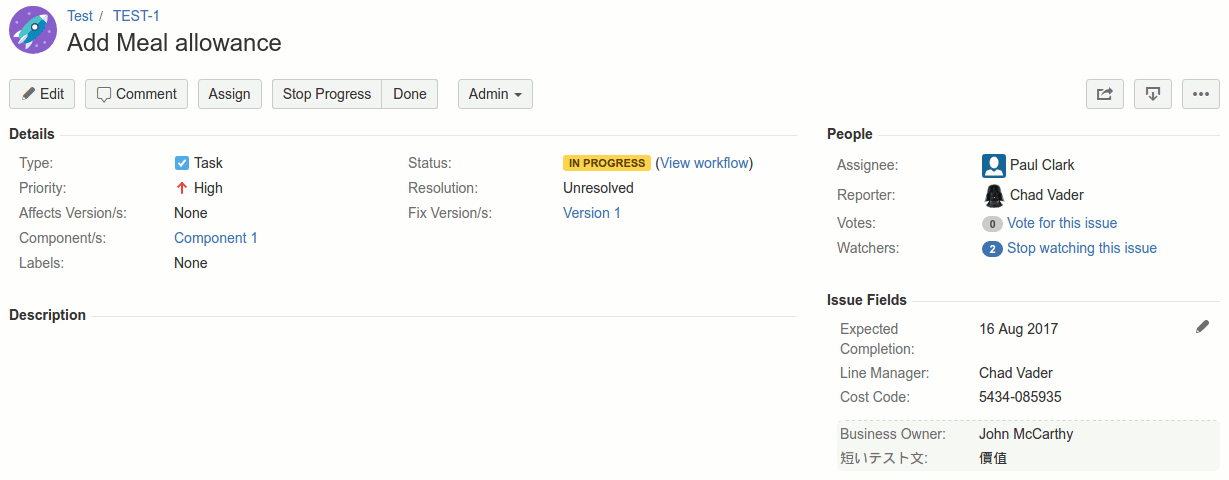
Issues can show the following Custom Fields in an Issue:
Fields that have “Visible In” set to Issue
Fields that have “Visible In” set to Project and also have the “Also show in Issue” set.
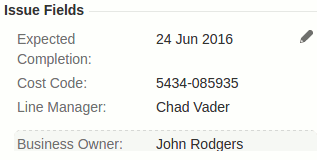
The screenshot below shows the custom fields being shown in an Issue. At the top are all of the Issue custom fields. These are ordered by the fields order value and then by the label text. Project custom fields marked as “Also show in Issue” are then shown under the Issue fields and are enclosed in a shaded box to differentiate them. These are ordered by the fields order value and then the label text.

Initially, any new custom Issue fields are empty. If any of the fields are mandatory and they contain no value then the text “Value Required” will be shown in red (Issue and Project custom fields).
Values can be edited by clicking on the pen icon on the right-hand side. This will open a dialog showing all custom fields for the Issue you are in. Project fields are not shown here and their values can only be set from the Project screen.
All mandatory field values must be entered before the values are updated.
Only users with the Edit Issue privilege are able to set or change the values in these fields. All users that can see this Issue are able to view the fields and their values.
The Custom Fields plugin offers a basic search capability for global project fields. This has simple search criteria that allows you to examine values set over multiple projects.
To access the Basic Project Search you will need to define who has access to the screen. To do this go to the Admin screens, then the Add-ons tab and select Configuration (under the Custom Fields section).
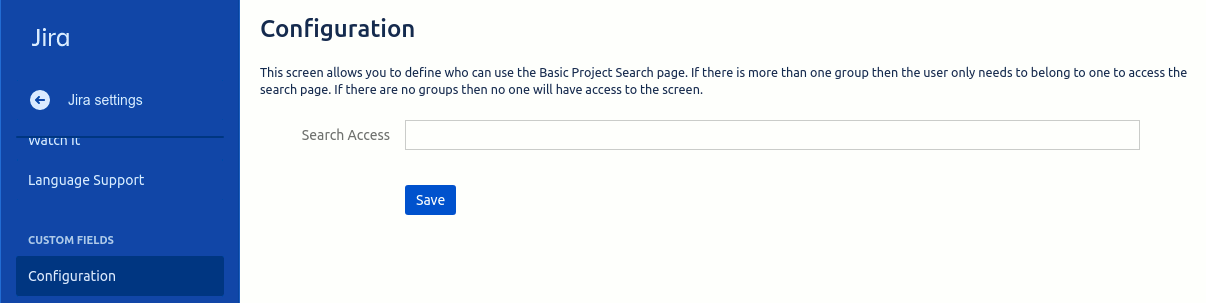
In this screen, you need to define which user groups have access to the search screen. Add one or more groups and save. If a user is in any of these groups then they can see and use the Basic Project Search screen. If no user groups are specified then no one has access to the search screen.
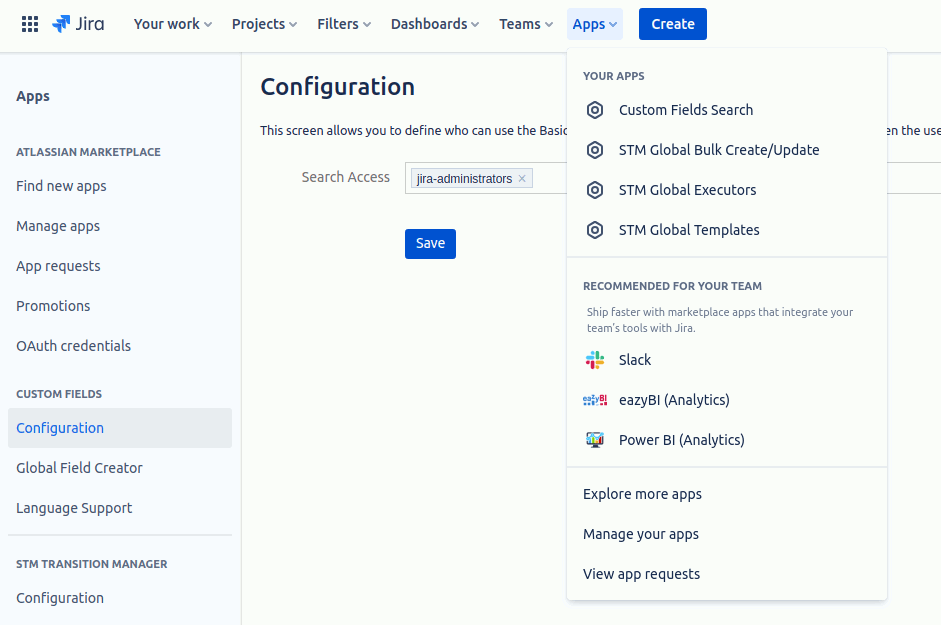
If a user has been granted access to the Basic Project Search then they will be able to see the Custom Fields menu on the left-hand side of the Dashboard screen. Clicking on Custom Fields will show the Basic Project Search menu item under the Apps menu.
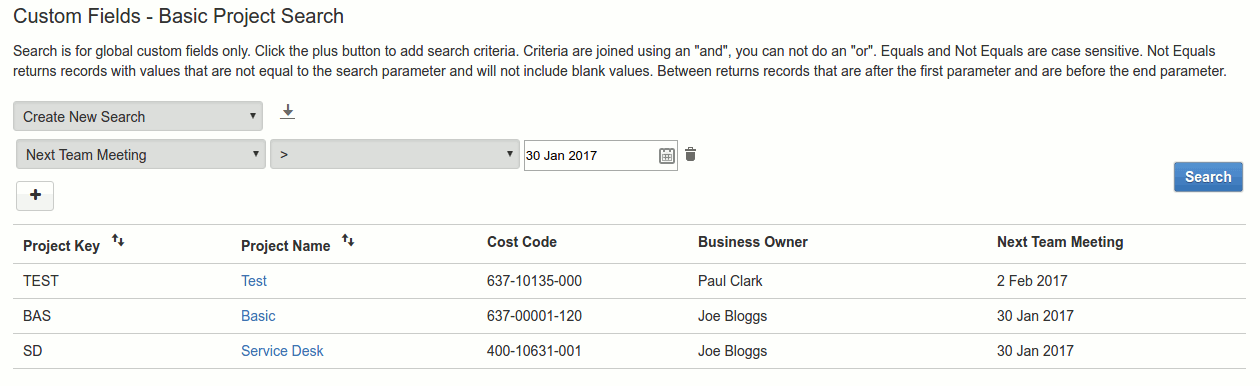
This page gives the user the ability to search over all global project custom fields (not project specific or issue fields).

On the left of the page is a drop-down that lets you create a new search or select an existing search. To the right of the drop-down is an icon for saving any created search and below the drop-down is a button, with a plus symbol, that adds a line of search criteria. The criteria let you choose a global project field, an operator (<, >, equals …) and a value (depending on the operator). If there are multiple search criteria then all criteria apply to a search (criteria 1 AND criteria 2 AND criteria 3 …). This is no current way of specifying criteria 1 OR criteria 2.
Clicking the Search button on the right-hand side of the page will initiate a search. Below is an example of a search with a single line of search criteria.
If the save icon (the icon to the right of the “Create New Search” dropdown) then the dialog below is shown.
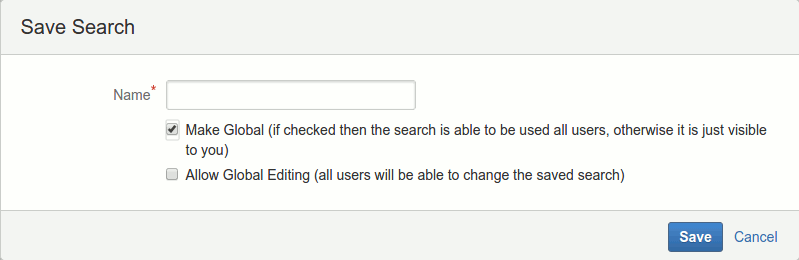
At the top is the name to identify the search. Below that is a Make Global check box. If this is NOT checked then only you can see the saved search. If it is checked then all other users that have access to the Basic Project Search screen can see the saved search. If Make Global is checked then the Allow Global Editing is also shown. If this is checked then other users are able to change the criteria and save those changes.
NOTE: Translations apply to all text EXCEPT the menu text, tab text and panel heading text.
The Language Support section allows you to choose a language or get the App to choose for you. Custom Fields comes with two languages pre-installed: English and German

This plugin allows you to create custom fields that belong to either a Project or an Issue. Custom fields can be defined globally (for all projects/issues) or at the project level (for only this project / only issues for this project).
Any created fields and their values are then available to see on a Custom Project screen or the Issue screen.
Custom fields can be defined globally so that they are applicable to all Projects or Issues. The Global Fields Creator screen can be found under the Admin System menu -> Add-ons -> Custom Fields.
The screen is used to define global custom fields that apply to all Projects (for those with “Visible In” set to Project) and/or all Issues (for those with “Visible In” set to Issue). Each field has a number of attributes associated with it:
The icons on the right of the screen allow you to edit, move the field up in the order, move the field down in the order and delete the field. Warning: Deleting a field will also delete all values stored for that field. The move icon swaps the order values. So clicking the move up icon for the Business Owner would set the Business Owners order to 10 and Expected Completion to 20.
New Custom Fields can be created using the New Field button. The following different types can be created.
The list item entry field has a set of icon buttons on the side that allows you to: move an item up, move an item down, edit the items value, delete an item, add a new item and add multiple new items. Warning: Deleting a list value that is in use will cause the fields that use this value to be blank, even if the value is added back in later.
The add-on allows you to do sub-lists of another project list. To accomplish this you need to set up a list that is visible in projects and allows the selection of multiple entries. You then create a new field of type “List from a Project field selection” that is visible in Issues.
Once items have been selected for the project those items will be the only items available for the issue field. So if you set up a project field with the list values Red, Green, Orange and Yellow. In the project fields screen, you select Red and Green. When you edit the issue field the field will have the entries Red and Green as options to select.
Only System admins can see and use the Global Custom Fields screen.
If the “Use JIRA Custom Field” option is checked then the value of a field will also be stored in a JIRA Custom Field. This allows the field value to be displayed and searched for in the Issue Navigator using JQL. The JIRA Custom Field is not displayed in the Issue, New Issue or Edit Issue screens. The value in the JIRA Custom Field should NOT be edited as this is only a copy of the fields actual value.
Only Issue fields of the type: Date, single Label, multiple Label, single item List, Number and String can be made searchable.
Validators allow you to assign validation to the values for a field.
The screen is used to define global validators that can be used in all global and project fields. The fields for each validator have a number of attributes associated with it:
The example below shows the different types of validators.
The alternative to entering global custom fields and validators is to have Project level fields and validators. The fields defined here will only appear in the Project they were created in and Issues belonging to that Project. The validators will only be able to be used for the fields defined in this project.
The functionality of this screen is identical to the Global Custom Fields/Validators screen so please read the section above to find out more details.
Only Project admins are able to see and use the Project Custom Fields screen.
Fields that have “Visible In” set to Project will appear in the screen below. Any values set for these fields will only appear in the Project they were set in.
Initially, any new custom Project fields are empty. If the field is mandatory and there is no value then the text “Value Required” will be shown in red.
Values can be edited by clicking on the “Edit Values” link. This will open a dialog showing all custom fields for the Project you are in. For the example below the entry for the Business Owner is a string field but it could also be a user field if the business owner was a user within Jira.
All mandatory field values must be entered before the values are updated.
Only Project admins are able to set or change the values in these fields. All users are able to see this screen and the field values.
Issues can show the following Custom Fields in an Issue:
Fields that have “Visible In” set to Issue
Fields that have “Visible In” set to Project and also have the “Also show in Issue” set.
The screenshot below shows the custom fields being shown in an Issue. At the top are all of the Issue custom fields. These are ordered by the fields order value and then by the label text. Project custom fields marked as “Also show in Issue” are then shown under the Issue fields and are enclosed in a shaded box to differentiate them. These are ordered by the fields order value and then the label text.
Initially, any new custom Issue fields are empty. If any of the fields are mandatory and they contain no value then the text “Value Required” will be shown in red (Issue and Project custom fields).
Values can be edited by clicking on the pen icon on the right-hand side. This will open a dialog showing all custom fields for the Issue you are in. Project fields are not shown here and their values can only be set from the Project screen.
All mandatory field values must be entered before the values are updated.
Only users with the Edit Issue privilege are able to set or change the values in these fields. All users that can see this Issue are able to view the fields and their values.
The Custom Fields plugin offers a basic search capability for global project fields. This has simple search criteria that allows you to examine values set over multiple projects.
To access the Basic Project Search you will need to define who has access to the screen. To do this go to the Admin screens, then the Add-ons tab and select Configuration (under the Custom Fields section).
In this screen, you need to define which user groups have access to the search screen. Add one or more groups and save. If a user is in any of these groups then they can see and use the Basic Project Search screen. If no user groups are specified then no one has access to the search screen.
If a user has been granted access to the Basic Project Search then they will be able to see the Custom Fields menu on the left-hand side of the Dashboard screen. Clicking on Custom Fields will show the Basic Project Search menu item under the Apps menu.
This page gives the user the ability to search over all global project custom fields (not project specific or issue fields).
On the left of the page is a drop-down that lets you create a new search or select an existing search. To the right of the drop-down is an icon for saving any created search and below the drop-down is a button, with a plus symbol, that adds a line of search criteria. The criteria let you choose a global project field, an operator (<, >, equals …) and a value (depending on the operator). If there are multiple search criteria then all criteria apply to a search (criteria 1 AND criteria 2 AND criteria 3 …). This is no current way of specifying criteria 1 OR criteria 2.
Clicking the Search button on the right-hand side of the page will initiate a search. Below is an example of a search with a single line of search criteria.
If the save icon (the icon to the right of the “Create New Search” dropdown) then the dialog below is shown.
At the top is the name to identify the search. Below that is a Make Global check box. If this is NOT checked then only you can see the saved search. If it is checked then all other users that have access to the Basic Project Search screen can see the saved search. If Make Global is checked then the Allow Global Editing is also shown. If this is checked then other users are able to change the criteria and save those changes.
NOTE: Translations apply to all text EXCEPT the menu text, tab text and panel heading text.
The Language Support section allows you to choose a language or get the App to choose for you. Custom Fields comes with two languages pre-installed: English and German
The following REST APIs allow external systems to retrieve and manage Custom Fields data.
Note: All API calls require a token parameter — this is a unique customer key available on the Custom Fields Global Configuration page.
Description: Retrieve all fields for a specific project key. Use a project key of Global to get globally defined fields.
Method: GET
URL: https://redmoon-custom-fields.appspot.com/_ah/api/customfield/v1/getFieldsForProject
Parameters:
token – Your unique customer token (required)
projectKey – Key of the project (required)
Example Request:
Example Response:
{
    "items": [
        {
            "visibleIn": "project",
            "allowMultipleEntries": false,
            "parentProjectFieldId": "0",
            "description": "",
            "label": "Business Owner",
            "mandatory": false,
            "alsoShowInIssue": false,
            "projectKey": "RAE",
            "id": "250870003",
            "projectId": "10192",
            "fieldType": "string",
            "order": "10"
        },
        {
            "visibleIn": "project",
            "allowMultipleEntries": false,
            "parentProjectFieldId": "0",
            "description": "",
            "label": "Proj Global Field",
            "mandatory": false,
            "alsoShowInIssue": false,
            "projectKey": "RAE",
            "id": "264960003",
            "projectId": "-1",
            "fieldType": "string",
            "order": "20"
        },
        {
            "visibleIn": "project",
            "allowMultipleEntries": false,
            "parentProjectFieldId": "0",
            "description": "",
            "label": "Global User",
            "mandatory": false,
            "alsoShowInIssue": false,
            "projectKey": "RAE",
            "id": "250940003",
            "projectId": "-1",
            "fieldType": "user",
            "order": "30"
        }
    ]
}
Description: Retrieve all fields for a specific issue key.
Method: GET
URL:
Parameters:
token – Your unique customer token (required)
issueKey – Issue key (e.g., RAE-1)
Example Request:
Example Response:
{
    "items": [
        {
            "visibleIn": "issue",
            "allowMultipleEntries": false,
            "issueKey": "RAE-1",
            "parentProjectFieldId": "0",
            "description": "",
            "label": "Project Manager Project Manager",
            "mandatory": false,
            "listValues": {
                "counter": 4.0,
                "list": [
                    {
                        "id": 2.0,
                        "text": "David"
                    },
                    {
                        "id": 3.0,
                        "text": "Jolene"
                    },
                    {
                        "id": 3.0,
                        "text": "Freddie"
                    }
                ]
            },
            "alsoShowInIssue": false,
            "id": "253090005",
            "projectId": "-1",
            "fieldType": "list",
            "order": "10"
        },
        {
            "visibleIn": "issue",
            "allowMultipleEntries": false,
            "issueKey": "RAE-1",
            "parentProjectFieldId": "0",
            "description": "",
            "label": "Employee",
            "mandatory": false,
            "alsoShowInIssue": false,
            "id": "255250004",
            "projectId": "10192",
            "fieldType": "string",
            "order": "30"
        },
        {
            "visibleIn": "issue",
            "allowMultipleEntries": false,
            "issueKey": "RAE-1",
            "parentProjectFieldId": "0",
            "description": "The charge for the billable work",
            "label": "Cost Codes",
            "mandatory": false,
            "listValues": {
                "counter": 6.0,
                "list": [
                    {
                        "id": 1.0,
                        "text": "010-007-019"
                    },
                    {
                        "id": 2.0,
                        "text": "010-007-020"
                    },
                    {
                        "id": 3.0,
                        "text": "010-008-331"
                    },
                    {
                        "id": 4.0,
                        "text": "011-001-090"
                    },
                    {
                        "id": "5.0",
                        "text": "011-001-102"
                    }
                ]
            },
            "alsoShowInIssue": false,
            "id": "250910003",
            "projectId": "10192",
            "fieldType": "list",
            "order": "40"
        }
    ]
}
Description: Get full details of a custom field by its field ID.
Method: GET
URL:
Parameters:
token – Your unique customer token (required)
fieldId – ID of the field (required)
Example Request:
Example Response:
{
    "visibleIn": "issue",
    "allowMultipleEntries": false,
    "parentProjectFieldId": "0",
    "description": "The charge for the billable work",
    "label": "Cost Codes",
    "mandatory": false,
    "listValues": {
        "counter": 6.0,
        "list": [
            {
                "id": 1.0,
                "text": "010-007-019"
            },
            {
                "id": 2.0,
                "text": "010-007-020"
            },
            {
                "id": 3.0,
                "text": "010-008-331"
            },
            {
                "id": 4.0,
                "text": "011-001-090"
            },
            {
                "id": "5.0",
                "text": "011-001-102"
            }
        ]
    },
    "alsoShowInIssue": false,
    "projectKey": "RAE",
    "id": "250910003",
    "projectId": "10192",
    "fieldType": "list",
    "order": "40"
}
Description: Retrieve the field definition and its value for a specific project key.
Method: GET
URL:
Parameters:
token – Your unique customer token (required)
fieldId – ID of the field (required)
projectKey – Key of the project (required)
Example Request:
Example Response:
{
    "visibleIn": "project",
    "allowMultipleEntries": false,
    "parentProjectFieldId": "0",
    "description": "",
    "label": "Business Owner",
    "mandatory": false,
    "alsoShowInIssue": false,
    "projectKey": "RAE",
    "id": "250870003",
    "projectId": "10192",
    "fieldType": "string",
    "value": "Owner Value",
    "order": "10"
} Description: Retrieve a field’s definition and its value for a specific issue key.
Method: GET
URL:
Parameters:
token– Your unique customer token (required)
fieldId– ID of the field (required)
issueKey– Key of the issue (required)
Example Request:
Example Response:
{
    "visibleIn": "issue",
    "allowMultipleEntries": false,
    "issueKey": "RAE-1",
    "parentProjectFieldId": "0",
    "description": "The charge for the billable work",
    "label": "Cost Codes",
    "mandatory": false,
    "listValues": {
        "counter": 6.0,
        "list": [
            {
                "id": 1.0,
                "text": "010-007-019"
            },
            {
                "id": 2.0,
                "text": "010-007-020"
            },
            {
                "id": 3.0,
                "text": "010-008-331"
            },
            {
                "id": 4.0,
                "text": "011-001-090"
            },
            {
                "id": "5.0",
                "text": "011-001-102"
            }
        ]
    },
    "alsoShowInIssue": false,
    "id": "250910003",
    "projectId": "10192",
    "fieldType": "list",
    "order": "40"
}
Description: Get all field values for a given project.
Method: GET
URL:
Parameters:
token – Your unique customer token (required)
projectKey – Key of the project (required).
Example Request:
Example Response:
{
    "items": [
        {
            "visibleIn": "project",
            "allowMultipleEntries": false,
            "parentProjectFieldId": "0",
            "description": "",
            "label": "Business Owner",
            "mandatory": false,
            "alsoShowInIssue": false,
            "projectKey": "RAE",
            "id": "250870003",
            "projectId": "10192",
            "fieldType": "string",
            "value": "Owner Value",
            "order": "10"
        },
        {
            "visibleIn": "project",
            "allowMultipleEntries": false,
            "parentProjectFieldId": "0",
            "description": "",
            "label": "Proj Global Field",
            "mandatory": false,
            "alsoShowInIssue": false,
            "projectKey": "RAE",
            "id": "264960003",
            "projectId": "-1",
            "fieldType": "string",
            "value": "Wibble",
            "order": "20"
        },
        {
            "visibleIn": "project",
            "allowMultipleEntries": false,
            "parentProjectFieldId": "0",
            "description": "",
            "label": "Global User",
            "mandatory": false,
            "alsoShowInIssue": false,
            "projectKey": "RAE",
            "id": "250940003",
            "projectId": "-1",
            "fieldType": "user",
            "value": "557058:20c30253-620a-466f-b04f-1fc38afa6264",
            "order": "30"
        }
    ]
}
Description: Get all field values for a given issue.
Method: GET
URL:
Parameters:
token – Your unique customer token (required)
issueKey – Key of the issue (required)
Example Request:
Example Response:
{
    "items": [
        {
            "visibleIn": "issue",
            "allowMultipleEntries": false,
            "issueKey": "RAE-1",
            "parentProjectFieldId": "0",
            "description": "",
            "label": "Project Manager Project Manager",
            "mandatory": false,
            "listValues": {
                "counter": 4.0,
                "list": [
                    {
                        "id": 2.0,
                        "text": "David"
                    },
                    {
                        "id": 3.0,
                        "text": "Jolene"
                    },
                    {
                        "id": 3.0,
                        "text": "Freddie"
                    }
                ]
            },
            "alsoShowInIssue": false,
            "id": "253090005",
            "projectId": "-1",
            "fieldType": "list",
            "value": [
                "2"
            ],
            "order": "10"
        },
        {
            "visibleIn": "issue",
            "allowMultipleEntries": false,
            "issueKey": "RAE-1",
            "parentProjectFieldId": "0",
            "description": "",
            "label": "Employee",
            "mandatory": false,
            "alsoShowInIssue": false,
            "id": "255250004",
            "projectId": "10192",
            "fieldType": "string",
            "value": "Timothy",
            "order": "30"
        },
        {
            "visibleIn": "issue",
            "allowMultipleEntries": false,
            "issueKey": "RAE-1",
            "parentProjectFieldId": "0",
            "description": "The charge for the billable work",
            "label": "Cost Codes",
            "mandatory": false,
            "listValues": {
                "counter": 6.0,
                "list": [
                    {
                        "id": 1.0,
                        "text": "010-007-019"
                    },
                    {
                        "id": 2.0,
                        "text": "010-007-020"
                    },
                    {
                        "id": 3.0,
                        "text": "010-008-331"
                    },
                    {
                        "id": 4.0,
                        "text": "011-001-090"
                    },
                    {
                        "id": "5.0",
                        "text": "011-001-102"
                    }
                ]
            },
            "alsoShowInIssue": false,
            "id": "250910003",
            "projectId": "10192",
            "fieldType": "list",
            "order": "40"
        }
    ]
}
Description: Add a new option to a select list field.
Method: PUT
URL:
Parameters:
token – Your unique customer token (required)
Example Request:
Example Response:
{
    "field": {
        "visibleIn": "issue",
        "allowMultipleEntries": false,
        "parentProjectFieldId": "0",
        "description": "The charge for the billable work",
        "label": "Cost Codes",
        "mandatory": false,
        "listValues": {
            "counter": 6.0,
            "list": [
                {
                    "id": 1.0,
                    "text": "010-007-019"
                },
                {
                    "id": 2.0,
                    "text": "010-007-020"
                },
                {
                    "id": 3.0,
                    "text": "010-008-331"
                },
                {
                    "id": 4.0,
                    "text": "011-001-090"
                },
                {
                    "id": "5.0",
                    "text": "011-001-102"
                }
            ]
        },
        "alsoShowInIssue": false,
        "projectKey": "RAE",
        "id": "250910003",
        "projectId": "10192",
        "fieldType": "list",
        "order": "40"
    },
    "optionId": "5.0"
}