Hide your attachments. Document Vault offers a secure attachment repository that can be hidden from all but a select user group.
Hide your attachments. Document Vault offers a secure attachment repository that can be hidden from all but a select user group.
The Document Vault app consists of functionality in four different areas:
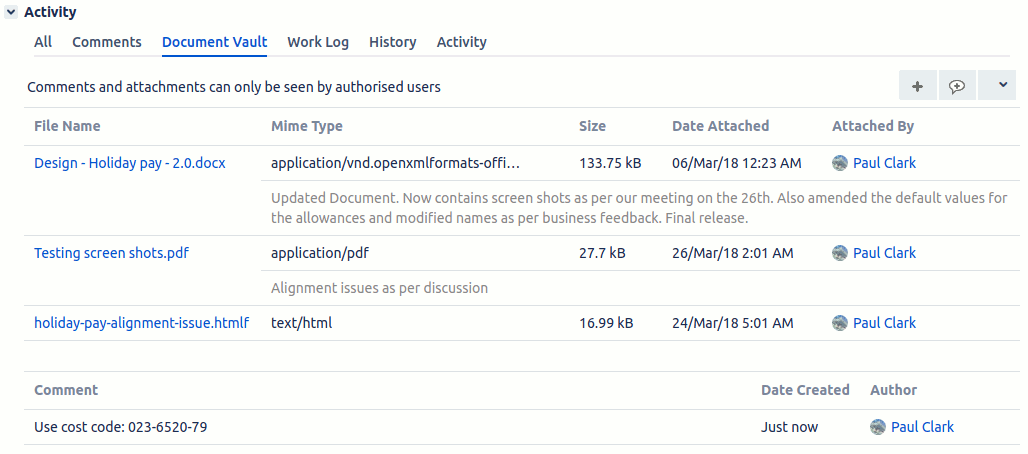
On an Issue, the Document Vault panel can be displayed in one of two positions:
The position of the panel can be changed on the Admin Document Vault page (see below). The pictures below show the two different layout positions. In both layout positions, the functionality is identical and the same information is displayed.
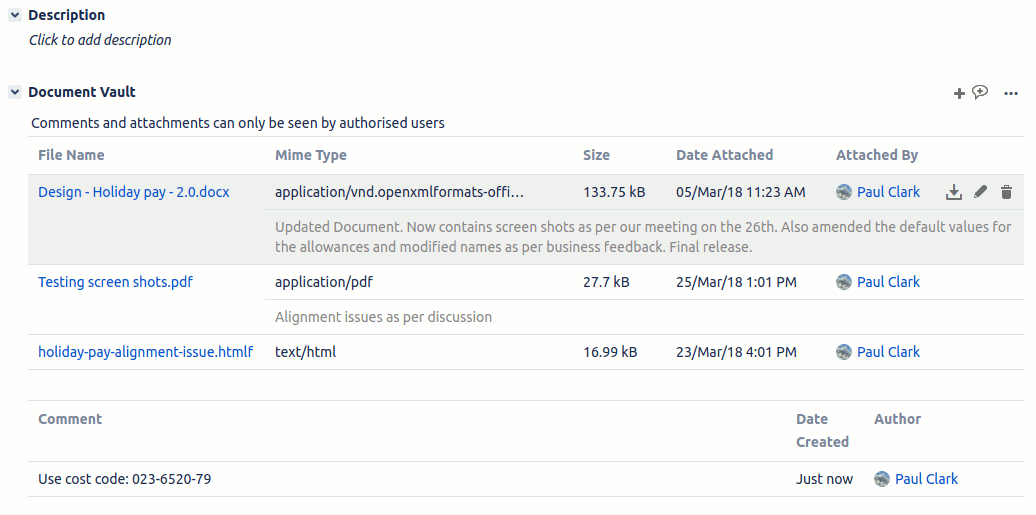
From an Issue, you can view and add attachments in the Document Vault. The “Document Vault” panel with any attachments and comments are only visible to users authorised from the Admin Document Vault screen (see below).
Clicking on the attachment’s name will download the attachment. To the right-hand side of each attachments details, are three buttons for updating the attachment, editing/creating the comment and deleting the comment.
All attachments can be downloaded by using the menu to the right of the “+” / “Attach” button. This will download a zip file containing all of the attachments displayed in the Issues Document Vault.
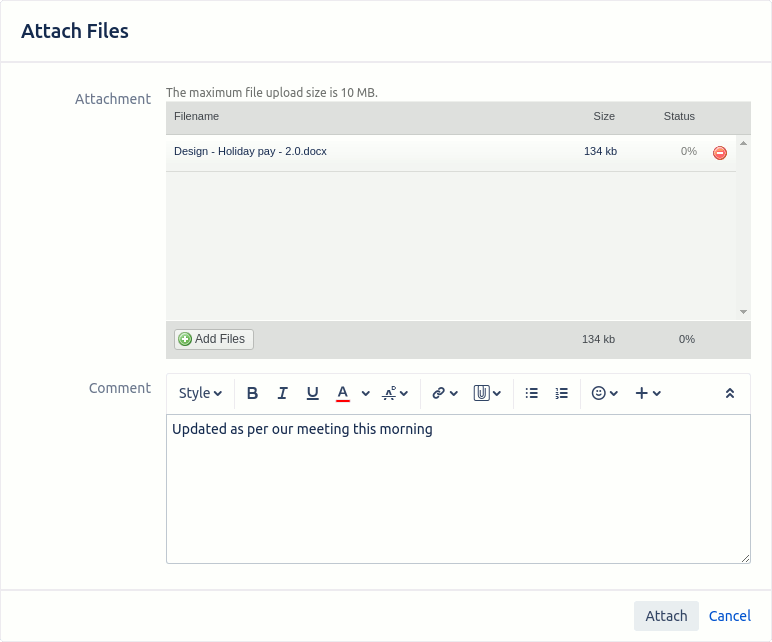
Attachments can be added by clicking on the “+” or “Attach” button. Once added the attachment details are shown along with the optional comment. Multiple files may be upload at the same time by repeatedly clicking the Browse button and selecting files. If a comment is added to a multi-file upload the same comment is put against all files.
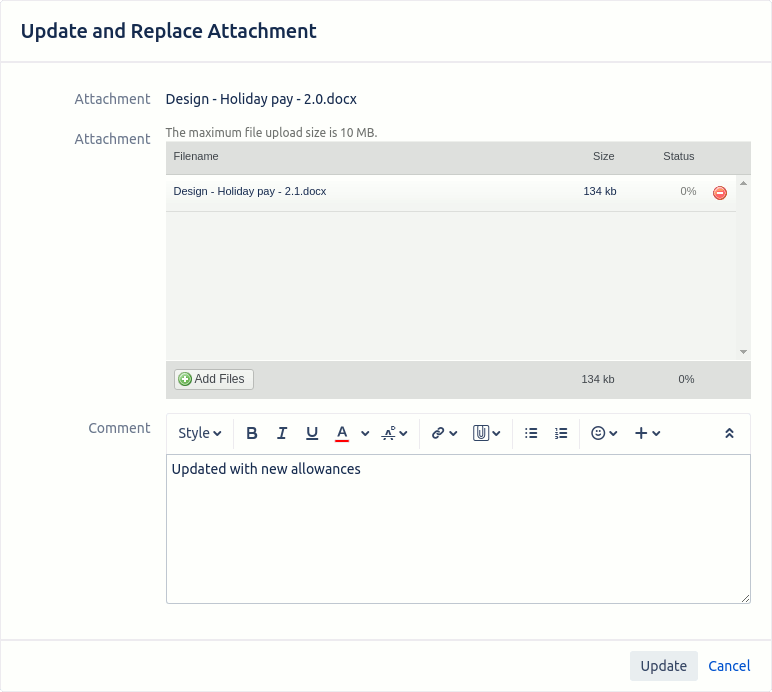
Updating an attachment will replace the existing attachment with a new version. The updated attachment does not need to have the same file name.
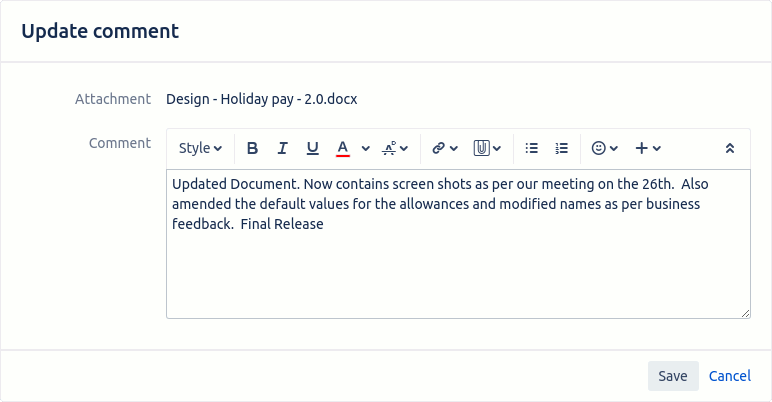
An attachment has an optional comment that is shown (only if present) below the details of the attachment. The comment can be edited or created (if it doesn’t already exist) by clicking on the pencil icon on the right-hand side of the attachment details. Clicking on the icon will allow you to change the comment. NOTE: This is not available for JIRA attachments displayed in the Document Vault panel (see the Admin Document Vault page below for more details)
An attachment can be deleted by clicking on the rubbish bin icon. You will be prompted to confirm the deletion and then the attachment will be permanently removed.
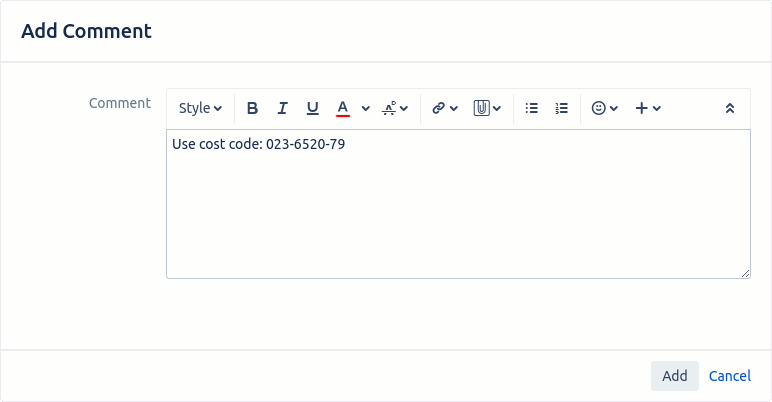
Document vault also allows for the entry of comments without an attachment. Clicking on the comment with a plus icon will open the following dialog.
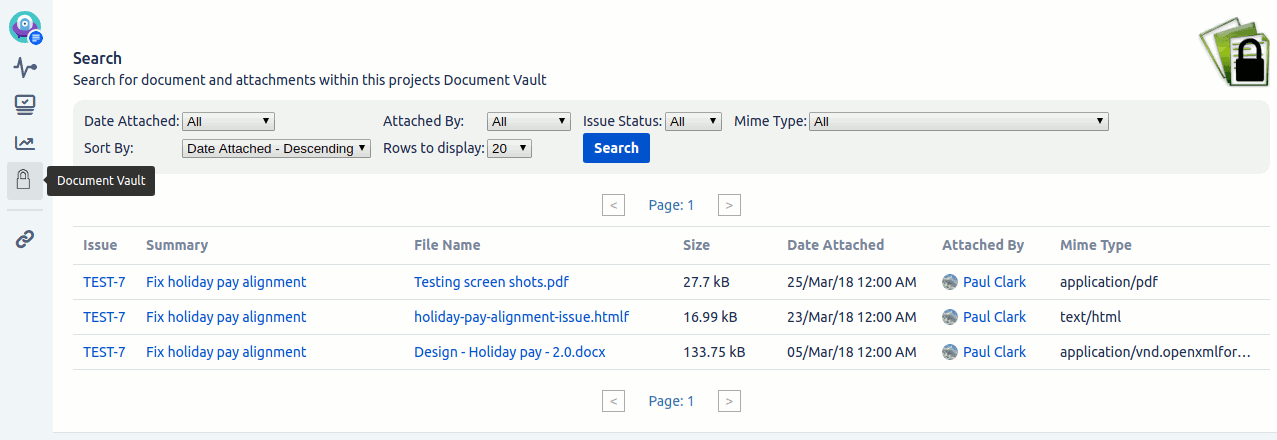
The Project Documents tab appears in the left-hand menu of the Project Overview section. This tab allows you to search through all of the vault attachments in the selected project. The image below shows an example Project Documents Vault tab with search results showing.
The visibility of this tab is determined by whom you give access (see the Admin Document Vault section for more details). If access is only given to users belonging to one of the specified groups (not reporter and not assignee) then this tab is ONLY visible to users in one of the groups, and no one else.
If the reporter and/or assignee have access to Document Vault then this tab is visible to everyone. The results of a search are filtered in the following ways:
The user has the following options for sorting the results of a search:
The number of results displayed can be restricted to 20, 50 or 100.
The search results provide information on the related Issue as well as the attachment. Links in the results allow you to:
The admin Document Vault page allows an administrator to specify:
The page is accessible to an admin user from the Document Vault item under the Issue Features heading of the System section. The page consists of three tabs: Acces, General Config and Other Config which are described below
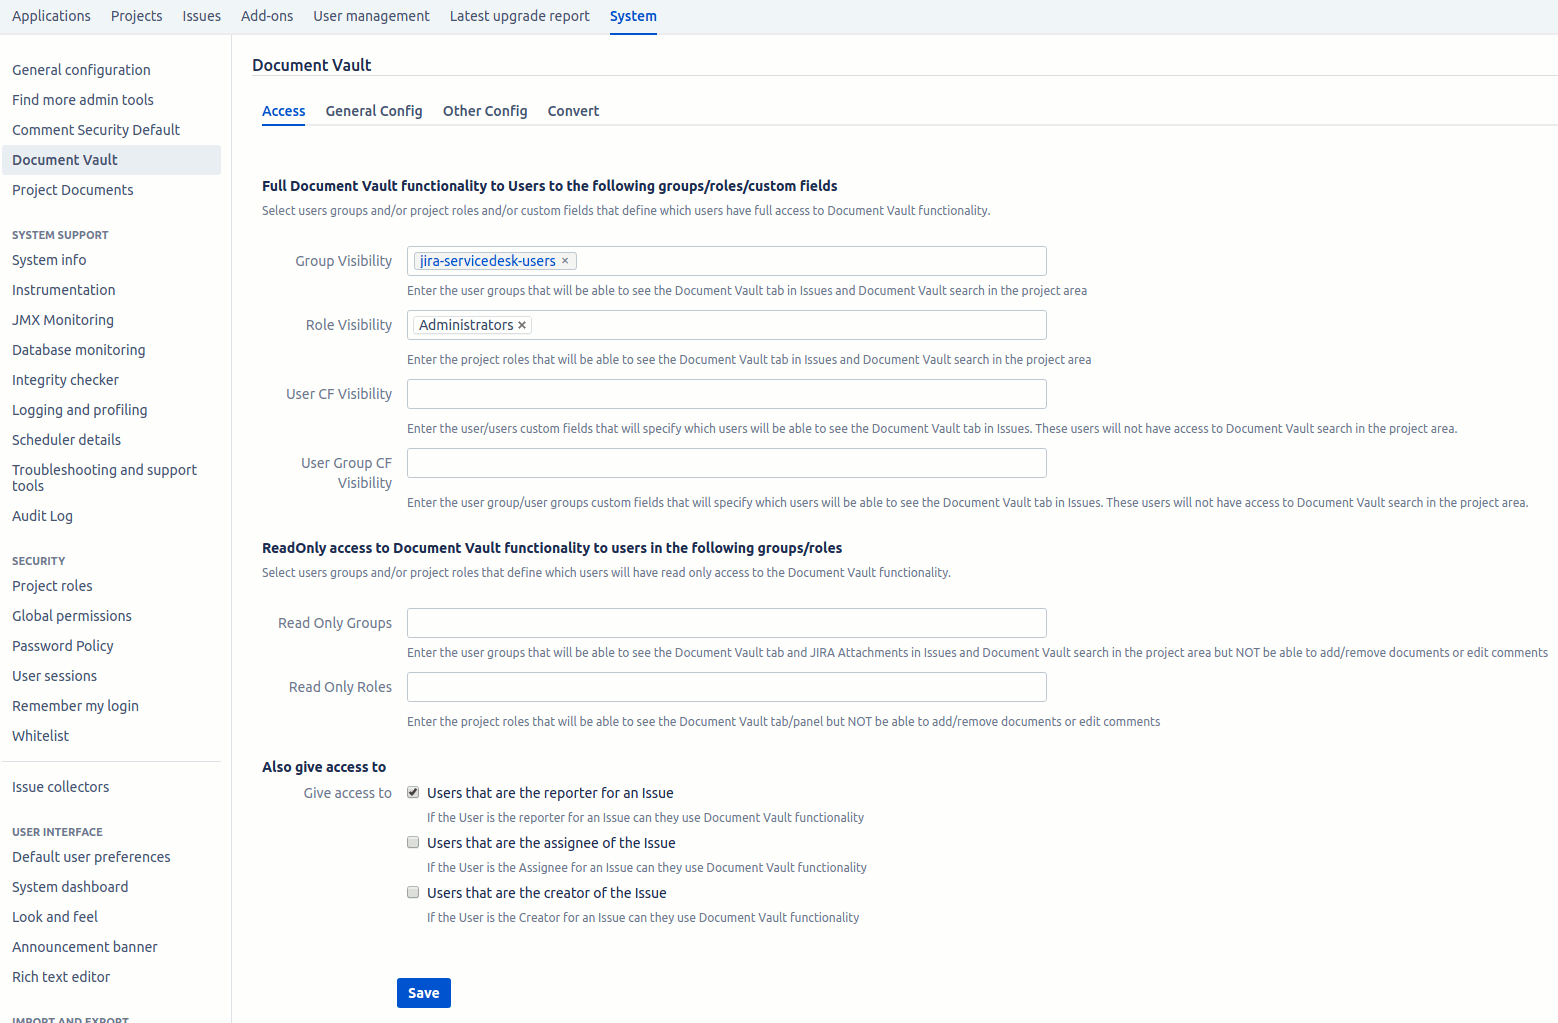
At the top of the form, you can specify which groups and roles a user can belong to so they can see and use the Document Vault. You can also specify user/users/group/groups custom fields that identify which users have access to a specific user. If a user is in the user(s) custom field or belongs to a group specified in the group(s) custom fields then they will have access to Document Vault in that issue. The access through the user and user group custom fields do not apply when accessing the Service Management portal page
This field allows you to specify user groups/roles that allow the user to see the Document Vault areas but not add/remove attachments or edit comments. If this field is left blank then no users will be treated as read-only.
Next, are two checkboxes that allow you to also give access to Document Vault to an Issues reporter and/or assignee. The reporter and/or assignee will then have access to the Document Vault functionality even if they do not belong to one of the groups specified above.

The next section is for the specification of the position that the Document Vault panel is displayed within the Issue screen. The panel can be displayed as either a tab (alongside comment, worklog etc) or at the same position as Attachments are currently displayed (Attachments is then displayed below this panel).
The Attachments section presents three options for dealing with existing Jira attachments. These options are:
If options 2 or 3 are selected then a checkbox called “Allow user to attach files in the comment field” is displayed. If this is checked then the user can add a Jira attachment by using the attach button on the comment menu bar (normally this is not shown when Jira attachments are disabled).
If option 3 is selected then a checkbox called “Convert to Jira Attachments” is displayed. If this is checked then all files loaded into Document Vault will be created as Jira Attachments, rather than Document Vault attachments. The Jira Attachment will still be shown in the Document Vault panel (as long as option three is selected). Because these attachments are Jira attachments they cannot have comments associated with them.
This provides the ability to Blacklist or Whitelist file extensions. The Blacklist and Whitelist extensions are entered as a comma-separated list containing just the extension, not the dot, i.e. gif, png, jpg. The checking of extensions are case insensitive and regular expressions can be used. There are three different ways of configuring this:
Entering both Blacklist and Whitelist is an invalid option because that would be the same as entering only Whitelist options.
This allows you to use Document Vault in just some Projects and to also restrain the use of the Plugin by Issue Type(s). If this is selected then initially no Projects can use Document Vault. Each Project that does want to use the plugin will have to configure this in the Activate Document Vault Project administration screen, see the next section for details.
If this checkbox is not ticked then all Project and all Issues will use Document Vault as configured.
This allows you to send a notification whenever a document is attached, which includes updating an existing file. You can configure the notifications to be sent to those users that have full attach privileges (Group Visibility) and/or those that have read-only access.
This allows you to control whether or not standalone comments (comments that don’t have a related attachment). can be used.
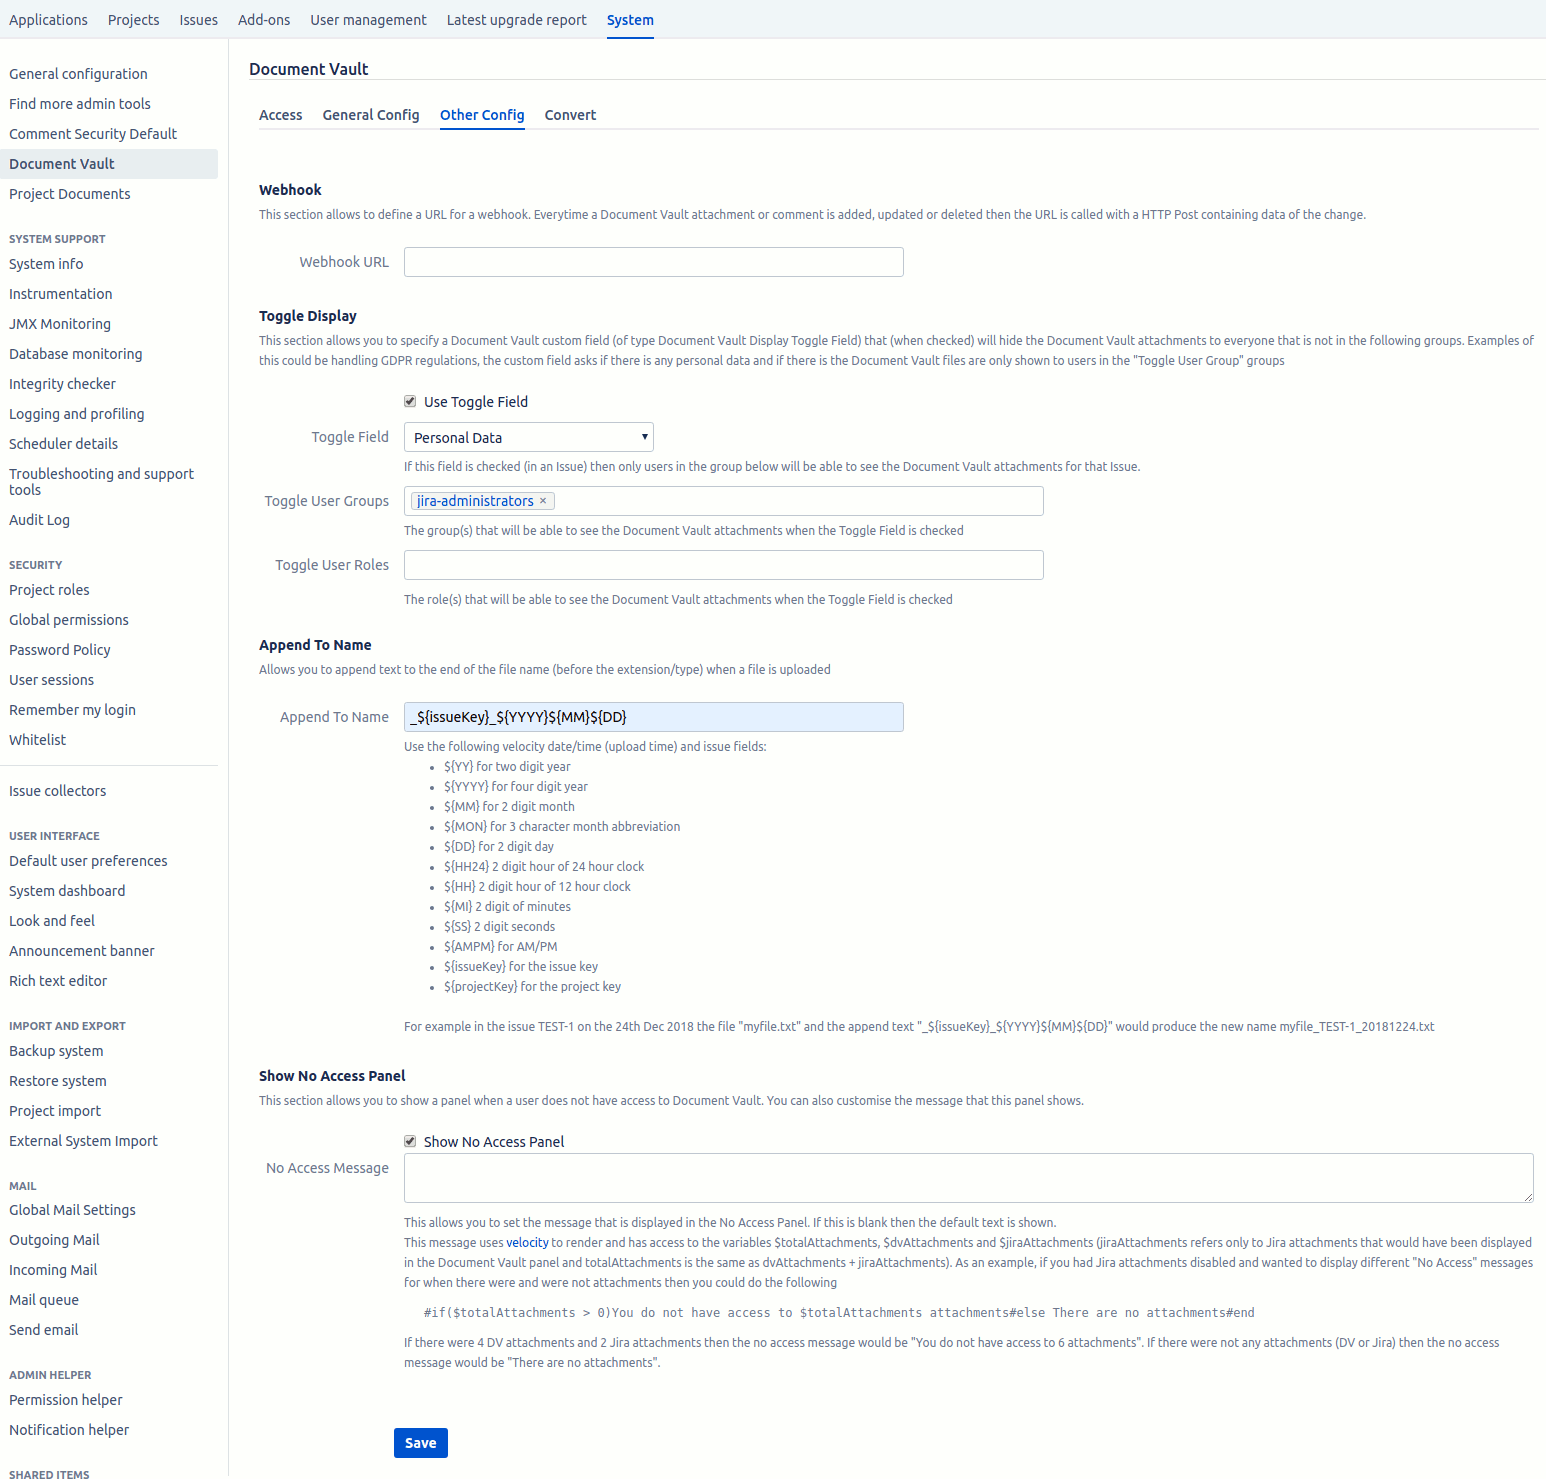
This allows you to specify a URL that will be posted a JSON message every time an attachment/comment is added, updated or deleted. The webhook URL makes it easy to have Document Vault changes synced to other systems.
The content of the posted messages is:
The Toggle Display section allows you to restrict access to the Document Vault functionality if a yes/no custom field is set to yes. An example of the use for this could be for handling personal data. If the custom field is set to yes, indicating that there is personal information in the documents, then access to those documents is restricted to the specified users.
To set this up you need to:
The Append To Name section allows you to add details to a filename when the file is uploaded. Any text in this field will be appended to the filename before the files’ extension, or at the end of the file if there is no extension. The appending uses Apache Velocity to place issue/project/date information into the field. The following values can be used:
For example, in the issue TEST-1 on the 24th Dec 2018, the file “myfile.txt” and the append text “_${issueKey}_${YYYY}${MM}${DD}” would produce the new name myfile_TEST-1_20181224.txt
Normally Document Vault will show the Document Vault panel to those users that are authorised and show nothing to those that have no access. If this checkbox is checked then a user will be shown a Document Vault panel containing only a message that says they do not have access.
This section has a button that opens the Convert to Jira Attachments dialog shown below.
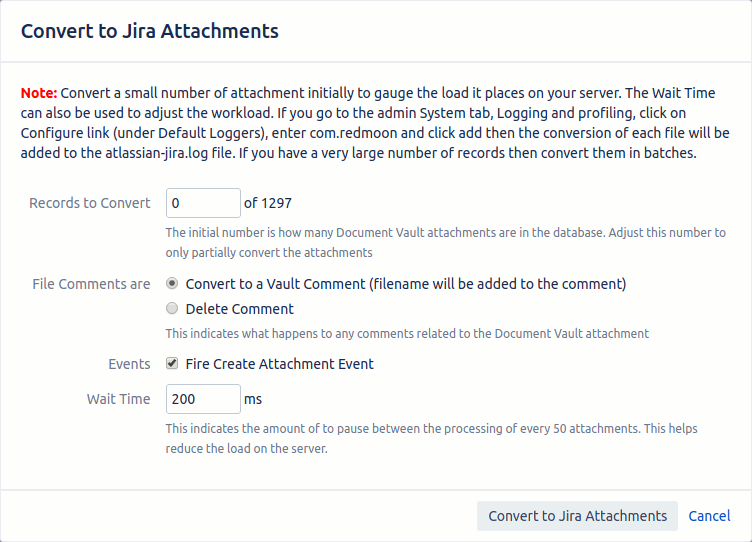
WARNING: Before you convert Document Vault attachments to Jira attachments please read and understand the following:
By default, the dialog won’t convert any records. You need to enter the number of records you want to convert into the “Records to Convert” field. The number to the right of this field (1297 in the example above) indicates how many Document Vault records there are in Jira.
The Comments shown next to the Document Vault files can either be converted to Vault comments or deleted. By default when a Jira attachment is created a create attachment event will be run. Uncheck the “Fire Create Attachment Event” if you don’t want this to happen.
The last field is a wait time. After every fifty files are converted the conversion process waits for the “Wait Time” milliseconds before doing the next fifty. This helps to lighten the load on the server so that other users aren’t disrupted so much. Increase or decrease this time to suit your needs.
When you are ready to convert click on the Convert to Jira Attachments button. This will close the dialog and start the conversion. Details of what is being converted will be shown in the Convert tab of the configuration page. If you leave or reload the page then the conversion details will be shown for up to five minutes (after the start of the conversion) on the convert tab.
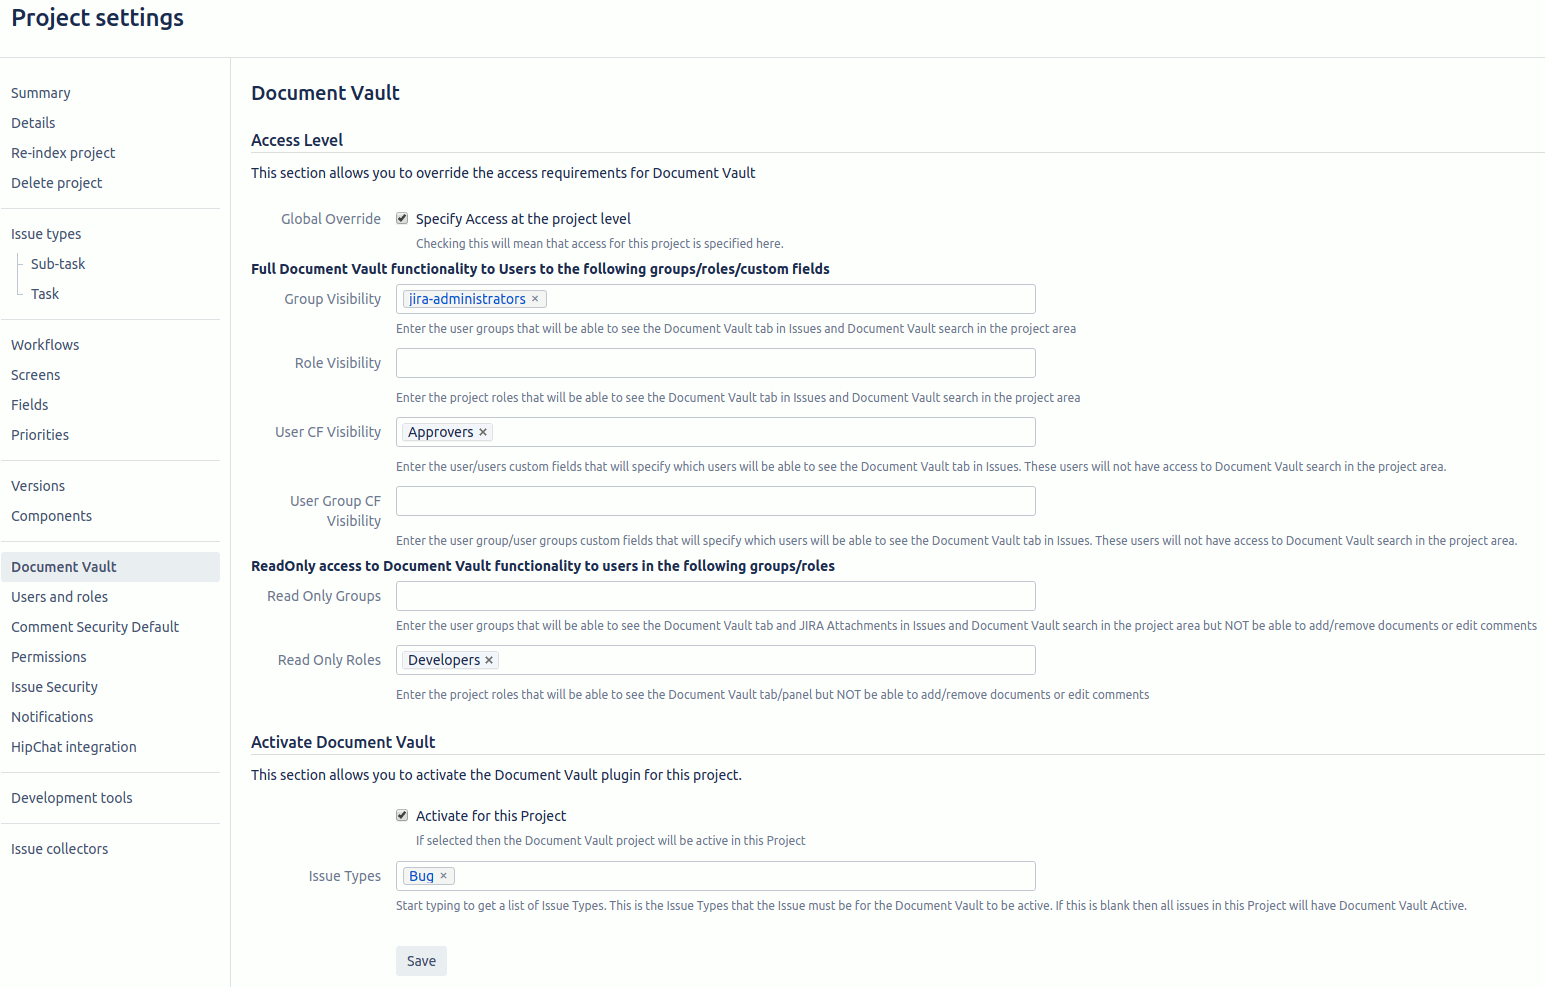
This page has two sections, access level and activate document vault. The Activate Document Vault is only functional if the “Only Activate in Projects” checkbox is ticked in the Admin Document Vault page. If the “Only Activate in Projects” checkbox is not ticked then Document Vault will be active for all projects.
If a Service Desk customer has access to the Document Vault panel (i.e. they are the reporter and the reporter can see the panel) then this will be shown on the right-hand side of the Service Desk Customer portals Issue view.

If the user has access to the Document Vault panel then they will be able to also see it in Agile boards and backlog. Below is an example of what is shown.
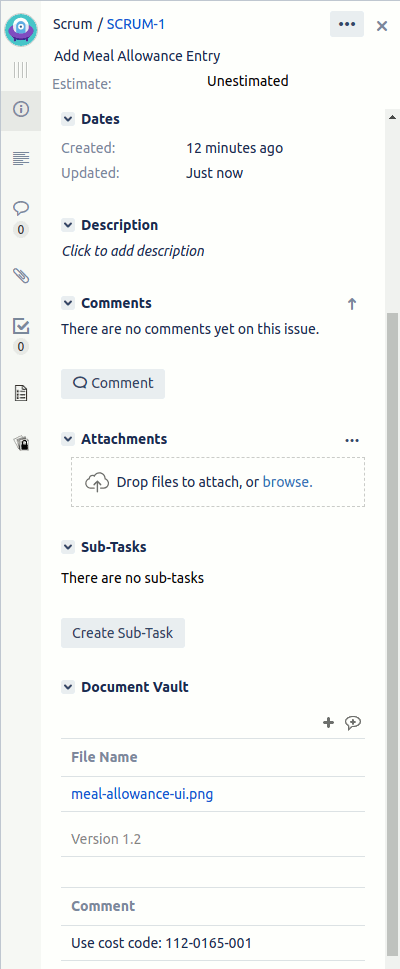
Functionality is the same as for the standard issue panel. Users can add new attachments, edit the comments, update the file/comment and delete attachments from here.
If you want to stop an issue transitioning from one status to another without a Document Vault attachment then you can use Document Vault validators. When a status transition occurs the validator will check to see if the attachments are present and if they are not it will display an error.

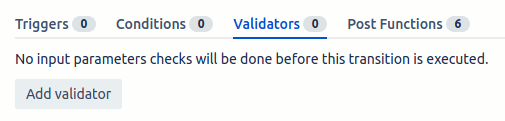
You will then be shown a list of validators. Document Vault has two:
An example is shown below. The top two options are the Document Vault validators
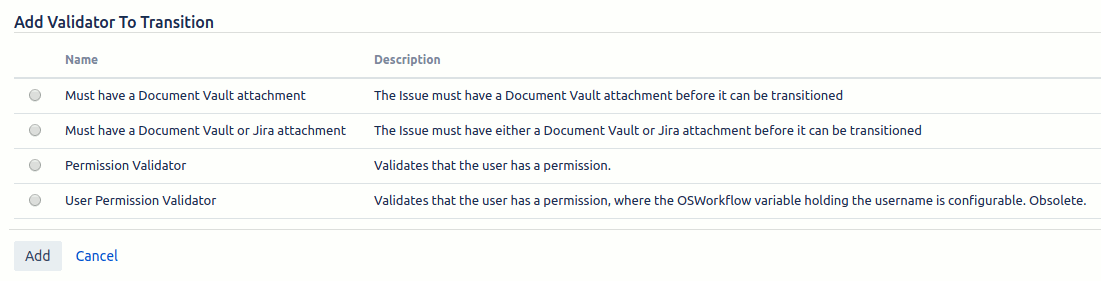
The following is an explanation of the top option, Must have a Document Vault attachment, but the setting up of either validator is identical.
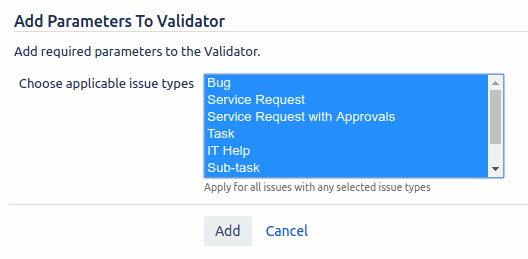
Once this has been added you be shown the validator details under the validator tab.

Next, you need to publish the workflow changes by clicking on the Publish button. The validator only becomes active once the workflow has been published.
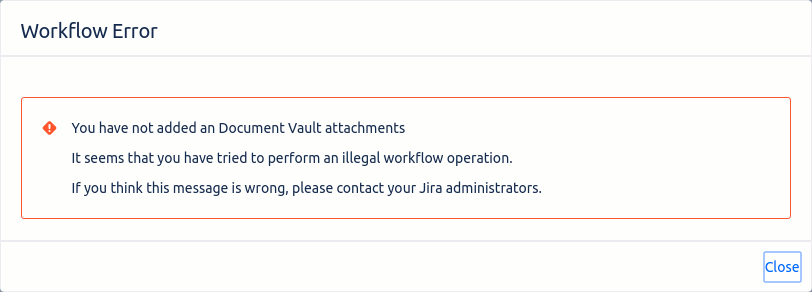
When you now try to transition to the given status an error like the one below will be shown.
Document Vault has a REST API that can be used for adding, modifying and deleting vault attachments and comments. The APIs require an authenticated user and are as follows:
Document Vault Attachments
GET /issue/{issueIdOrKey}/attachments/{attachmentId}
This returns details of an attachment that belongs to an issue.
Path Parameters
To get the details of an attachment from a particular issue
Example
curl –request GET –url ‘http://myjira.com/rest/documentvault/1.0/issue/TEST-1/attachments/45’ –user admin:password –header ‘Accept: application/json’ –header ‘X-Atlassian-Token: nocheck’ -D-
Return – Success
{
“wasSuccessful”: true,
“attachment”: {
“attachmentId”: 45,
“issueKey”: “TEST-1”,
“projectKey”: “TEST”,
“filename”: “test2.txt”,
“fileSize”: 7,
“mimeType”: “text/plain”,
“author”: “admin”,
“created”: “23/03/20 5:03 PM”,
“comment”: “Updated file to test2.txt”,
“commentedDate”: “23/03/20 4:48 PM”
}
}
Return – Error
{
“wasSuccessful”:false,
“errorMessage”:”User can not see Document Vault for this issue”
}
GET /issue/{issueIdOrKey}/attachments
This returns the details of all attachments that belong to a given issue.
Path Parameters
Example
To get the details of all Document Vault attachments from a particular issue
curl –request GET –url ‘http://myjira.com/rest/documentvault/1.0/issue/TEST-1/attachments’ –user admin:password –header ‘Accept: application/json’ –header ‘X-Atlassian-Token: nocheck’ -D-
Return – Success
{
“wasSuccessful”: true,
“attachments”: [{
“attachmentId”: 45,
“issueKey”: “TEST-1”,
“projectKey”: “TEST”,
“filename”: “test.txt”,
“fileSize”: 7,
“mimeType”: “text/plain”,
“author”: “admin”,
“created”: “23/03/20 4:48 PM”,
“comment”: “Test Comment”,
“commentedDate”: “23/03/20 4:48 PM”
},
{
“attachmentId”: 46,
“issueKey”: “TEST-1”,
“projectKey”: “TEST”,
“filename”: “test2.txt”,
“fileSize”: 7,
“mimeType”: “text/plain”,
“author”: “admin”,
“created”: “23/03/20 4:48 PM”,
“comment”: “Test Comment”,
“commentedDate”: “23/03/20 4:48 PM”
}]
}
Return – Error
{
“wasSuccessful”:false,
“errorMessage”:”User can not see Document Vault for this issue”
}
POST /issue/{issueIdOrKey}/attachments?comment=
This creates a new attachment that will belong to the given issue.
Path Parameters
URL Parameter
Example
To upload two files (test.txt and test2.txt) where both will have the comment “Test Comment”. To just upload one file remove the last -F parameter
curl –request POST –url ‘http://myjira.com/rest/documentvault/1.0/issue/TEST-1/attachments?comment=Test%20Comment’ –user admin:password –header ‘Accept: application/json’ –header ‘X-Atlassian-Token: nocheck’ -D- -F “file=@./test.txt” -F “file=@./test2.txt”
Return – Success
{
“wasSuccessful”:true,
“successfulFiles”:[{
“attachmentId”:45,
“issueKey”:”TEST-1″,
“projectKey”:”TEST”,
“filename”:”test.txt”,
“fileSize”:7,
“mimeType”:”text/plain”,
“author”:”admin”,
“created”:”23/03/20 4:48 PM”,
“comment”:”Test Comment”,
“commentedDate”:”23/03/20 4:48 PM”
},
{
“attachmentId”:46,
“issueKey”:”TEST-1″,
“projectKey”:”TEST”,
“filename”:”test2.txt”,
“fileSize”:7,
“mimeType”:”text/plain”,
“author”:”admin”,
“created”:”23/03/20 4:48 PM”,
“comment”:”Test Comment”,
“commentedDate”:”23/03/20 4:48 PM”
}],
“errorFiles”:[]
}
Return – Error
{
“wasSuccessful”:false,
“successfulFiles”:[],
“errorFiles”:[{
“filename”:”test.txt”,
“errorMessage”:”The file test.txt is not an allowed attachment type”
},{
“filename”:”test2.txt”,
“errorMessage”:”The file test2.txt is not an allowed attachment type”
}]
}
PUT /issue/{issueIdOrKey}/attachments/{attachmentId}?comment=
This updates the existing attachment with a new file. You can also optionally update the comment as well. If the comment is not supplied then the existing comment is not modified or set to blank.
Path Parameters
URL Parameter
Example
Use the following to update the existing file with another version of the file. The comment is also updated
curl –request PUT –url ‘http://myjira.com/rest/documentvault/1.0/issue/TEST-1/attachments/45?comment=Updated%20file%20to%20test2.txt’ –user admin:password –header ‘Accept: application/json’ –header ‘X-Atlassian-Token: nocheck’ -D- -F “file=@./test2.txt”
Return – Success
{
“wasSuccessful”:true,
“successfulFiles”:[{
“attachmentId”:45,
“issueKey”:”TEST-1″,
“projectKey”:”TEST”,
“filename”:”test2.txt”,
“fileSize”:7,
“mimeType”:”text/plain”,
“author”:”admin”,
“created”:”23/03/20 5:00 PM”,
“comment”:”Updated file to test2.txt”,
“commentedDate”:”23/03/20 5:03 PM”,
}],
“errorFiles”:[]
}
Return – Error
{
“wasSuccessful”:false,
“successfulFiles”:[],
“errorFiles”:[{
“filename”:”test2.txt”,
“errorMessage”:”The file test2.txt is not an allowed attachment type”
}]
}
PUT /issue/{issueIdOrKey}/attachments/{attachmentId}/comment?comment=
This updates the comment on an existing attachment.
Path Parameters
URL Parameter
Example
To update the comment on an existing attachment
curl –request PUT –url ‘http://myjira.com/rest/documentvault/1.0/issue/TEST-1/attachments/45/comment?comment=Updated%20file%20to%20test2.txt’ –user admin:password –header ‘Accept: application/json’ –header ‘X-Atlassian-Token: nocheck’ -D-
Return – Success
{
“wasSuccessful”:true,
“successfulFiles”:[{
“attachmentId”:45,
“issueKey”:”TEST-1″,
“projectKey”:”TEST”,
“filename”:”test2.txt”,
“fileSize”:7,
“mimeType”:”text/plain”,
“author”:”admin”,
“created”:”23/03/20 5:00 PM”,
“comment”:”Updated file to test2.txt”,
“commentedDate”:”23/03/20 5:03 PM”,
}],
“errorFiles”:[]
}
Return – Error
{
“wasSuccessful”:false,
“successfulFiles”:[],
“errorFiles”:[{
“filename”:”test2.txt”,
“errorMessage”:”The file test2.txt is not an allowed attachment type”
}]
}
DELETE /issue/{issueIdOrKey}/attachments/{attachmentId}
This deletes an attachment (and any related comment)
Path Parameters
Example
To delete the attachment
curl –request DELETE –user admin:password –header ‘Accept: application/json’ –header ‘X-Atlassian-Token: nocheck’ -D- –url ‘http://myjira.com/rest/documentvault/1.0/issue/TEST-1/attachments/46’
Return – Success
{
“wasSuccessful”:true
}
Return – Error
span class=”indent-space-one”>{
“wasSuccessful”:false,
“errorMessage”:”User can not see Document Vault for this issue”
}
DELETE /issue/{issueIdOrKey}/attachments/{attachmentId}/comment
This deletes just the comment from an attachment
Path Parameters
Example
To delete the attachment
curl –request DELETE –user admin:password –header ‘Accept: application/json’ –header ‘X-Atlassian-Token: nocheck’ -D- –url ‘http://myjira.com/rest/documentvault/1.0/issue/TEST-1/attachments/46/comment’
Return – Success
{
“wasSuccessful”:true
}
Return – Error
{
“wasSuccessful”:false,
“errorMessage”:”User can not see Document Vault for this issue”
}
This refers to the separate vault comments, not the comments that are related to the Document Vault attachments.
GET /issue/{issueIdOrKey}/comments/{commentId}
This returns details of a comment that belongs to an issue.
Path Parameters
Example
To get the details of a comment for a particular issue
curl –request GET –url ‘http://myjira.com/rest/documentvault/1.0/issue/TEST-1/comments/6’ –user admin:password –header ‘Accept: application/json’ –header ‘X-Atlassian-Token: nocheck’ -D-
Return – Success
{
“wasSuccessful”: true,
“comment”: {
“commentId”: 6,
“issueKey”: “TEST-1”,
“projectKey”: “TEST”,
“comment”: “Updated comment”,
“updated”: “26/03/20 12:07 PM”,
“created”: “26/03/20 11:56 AM”,
“author”: “admin”
}
}
Return – Error
{
“wasSuccessful”:false,
“errorMessage”:”User can not see Document Vault for this issue”
}
GET /issue/{issueIdOrKey}/comments
This returns all comments that belongs to an issue.
Path Parameters
Example
To get the details of all comments for a particular issue
curl –request GET –url ‘http://myjira.com/rest/documentvault/1.0/issue/TEST-1/comments’ –user admin:password –header ‘Accept: application/json’ –header ‘X-Atlassian-Token: nocheck’ -D-
Return – Success
{
“wasSuccessful”: true,
“comments”: [{
“commentId”: 6,
“issueKey”: “TEST-1”,
“projectKey”: “TEST”,
“comment”: “Updated comment”,
“updated”: “26/03/20 12:07 PM”,
“created”: “26/03/20 11:56 AM”,
“author”: “admin”
}, {
“commentId”: 7,
“issueKey”: “TEST-1”,
“projectKey”: “TEST”,
“comment”: “Second comment”,
“updated”: “26/03/20 12:14 PM”,
“created”: “26/03/20 12:14 PM”,
“author”: “admin”
}]
}
Return – Error
{
“wasSuccessful”:false,
“errorMessage”:”User can not see Document Vault for this issue”
}
POST /issue/{issueIdOrKey}/comments?comment=New%20comment
This creates a new comment for an issue.
Path Parameters
URL Parameter
Example
To create a comment for a particular issue
curl –request POST –url ‘http://myjira.com/rest/documentvault/1.0/issue/TEST-1/comments?comment=New%20comment’ –user admin:password –header ‘Accept: application/json’ –header ‘X-Atlassian-Token: nocheck’ -D-
Return – Success
{
“wasSuccessful”: true,
“comment”: {
“commentId”: 6,
“issueKey”: “TEST-1”,
“projectKey”: “TEST”,
“comment”: “New comment”,
“updated”: “26/03/20 11:56 AM”,
“created”: “26/03/20 11:56 AM”,
“author”: “admin”
}
}
Return – Error
{
“wasSuccessful”: false,
“errorMessage”: “You must specify a comment”
}
PUT /issue/{issueIdOrKey}/comments/{commentId}?comment=Updated%20comment
This updates an existing comment for an issue.
Path Parameters
URL Parameter
Example
To update the comment for a particular issue
curl –request PUT –url ‘http://myjira.com/rest/documentvault/1.0/issue/TEST-1/comments/6?comment=Updated%20comment’ –user admin:password –header ‘Accept: application/json’ –header ‘X-Atlassian-Token: nocheck’ -D-
Return – Success
{
“wasSuccessful”: true,
“comment”: {
“commentId”: 6,
“issueKey”: “TEST-1”,
“projectKey”: “TEST”,
“comment”: “Updated comment”,
“updated”: “26/03/20 12:07 PM”,
“created”: “26/03/20 11:56 AM”,
“author”: “admin”
}
}
Return – Error
{
“wasSuccessful”: false,
“errorMessage”: “You must specify a comment”
}
DELETE /issue/{issueIdOrKey}/comments/{commentId}
This deletes a comment from an issue.
Path Parameters
Example
To delete the comment from a particular issue
curl –request DELETE –url ‘http://localhost:8080/rest/documentvault/1.0/issue/TEST-1/comments/6’ –user admin:password –header ‘Accept: application/json’ –header ‘X-Atlassian-Token: nocheck’ -D-
Return – Success
{
“wasSuccessful”: true,
}
Return – Error
{
“wasSuccessful”: false,
“errorMessage”: “User can not see Document Vault for this issue”
}
DELETE /issue/{issueIdOrKey}/attachments
This deletes all attachments (and any related comment) from an issue
Path Parameters
Example
To delete the attachment
curl –request DELETE –user admin:password –header ‘Accept: application/json’ –header ‘X-Atlassian-Token: nocheck’ -D- –url ‘http://myjira.com/rest/documentvault/1.0/issue/TEST-1/attachments’
Return – Success
{
“wasSuccessful”:true
}
Return – Error
{
“wasSuccessful”:false,
“errorMessage”:”User can not see Document Vault for this issue”
}
DELETE /issue/{issueIdOrKey}/comments
This deletes all comments from an issue.
Path Parameters
Example
To delete the comment from a particular issue
curl –request DELETE –url ‘http://localhost:8080/rest/documentvault/1.0/issue/TEST-1/comments’ –user admin:password –header ‘Accept: application/json’ –header ‘X-Atlassian-Token: nocheck’ -D-
Return – Success
{
“wasSuccessful”: true,
}
Return – Error
{
“wasSuccessful”: false,
“errorMessage”: “User can not see Document Vault for this issue”
}